Deep dive: preparing a model for upload
What separates a model that produces a great scene from one that costs more and understands less: format, mesh structure, part naming, body count, and picking a sizing anchor you can trust.
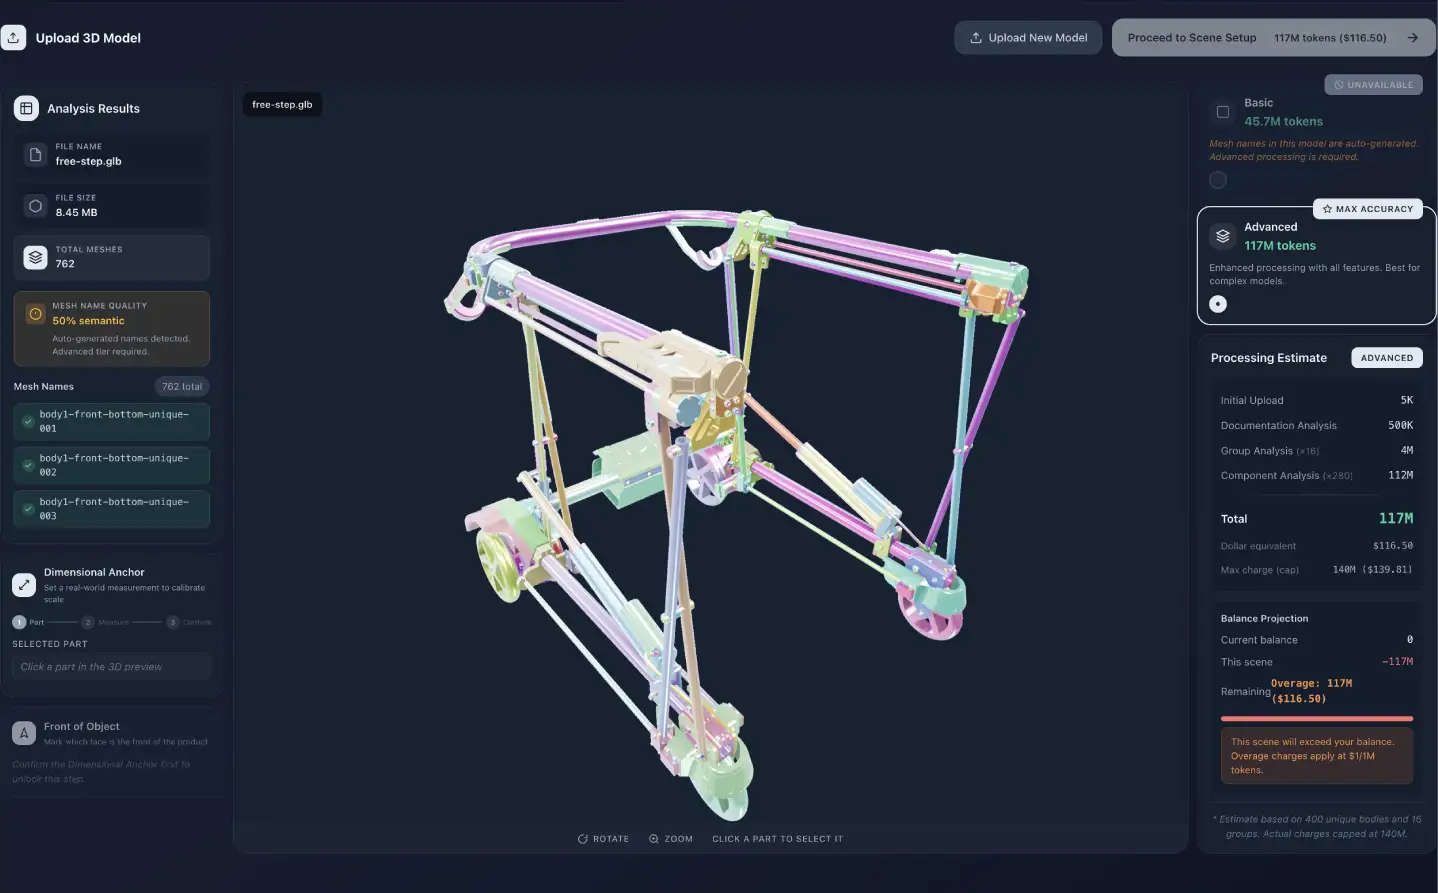
Two things are decided by the file you upload: how much the scene costs, and how well it understands your product. Both are largely settled before you ever open the studio. This is what to check first.
Send GLB
Cost and comprehension are both largely decided before you open the studio — by the file you export.
We accept GLB, GLTF, OBJ and FBX, and convert anything that isn’t GLB on arrival. Converting is lossy in small ways, so exporting GLB yourself means you decide what survives instead of us guessing.
Practically: GLB is the format to send. OBJ has no scene hierarchy worth speaking of, so structure you cared about disappears. FBX carries a great deal we discard anyway. GLTF is fine but ships as loose files unless you package it.
One mesh should be one real part
This is the single biggest quality factor, and the most common thing to get wrong.
The pipeline reasons about your product body by body. Every mesh in the file is treated as a candidate part: named, described, grouped with its neighbours, and made individually selectable in the finished scene. That only works if the meshes correspond to things a person would point at.
The joined-objects problem
The failure we see most often — and it comes from Blender and similar tools more than from CAD — is a single mesh containing several physically separate objects. Four bolts in different corners of the assembly, welded into one object called “Bolts”. Every cable in the machine, joined into “Wiring”.
The geometry looks correct on screen, so it’s easy to miss. But a mesh made of spatially disconnected islands can’t be reasoned about: it has no single position, no meaningful dimensions, and no honest answer to “where is it?”. Ask about one of those bolts and the scene highlights all four, scattered across the machine.
Rule of thumb: if two pieces of geometry never touch and a person would call them different things, they must be different meshes.
BAD — four bolts in different corners welded into one mesh called “Bolts”. It looks right on screen, but it has no single position and no honest answer to “where is it?”.
The opposite mistake
Over-splitting is real too, and it costs money directly — processing is charged per unique body, so every extra mesh is on the bill whether or not it earns its place.
Split geometry when it is a thing:
A part someone could order, replace, or ask about by name.
A part that moves independently — a hinge, a lid, a slider.
A part with its own material, function, or service interval.
Join geometry when it is not:
Mesh artefacts and stray fragments left behind by an exporter.
Decorative detail nobody will ever ask about individually — knurling, embossed logos, tread patterns.
Fasteners of the same type in the same place, where “the four lid screws” is the useful answer rather than four separate entries. Keep them as one part only if they truly act as one; if they are separately serviceable, keep them separate but distinct.
Anything that is really one object your modelling tool happened to split into shells.
The test is not geometric, it’s conversational: would anyone ever ask about this by itself? If not, it doesn’t need to be its own body.
GOOD — each fastener, gear and housing is its own mesh with its own name. Every part can be found, highlighted and measured on its own.
Naming is the cheapest money you will ever save
Two processing tiers are available, and which ones you can use is decided by your part names — not by us, and not by your budget.
Good names unlock Basic processing, which is substantially cheaper. Basic reads the names you already have and works from their meaning.
Exporter names force Advanced. If your meshes are called body_001 through body_400, there is no meaning to read, so the geometry itself has to be analysed to work out what everything is. That is the expensive path, and it is the only one that can work.
Renaming parts in your CAD or modelling tool before you export is, hour for hour, the highest-return preparation you can do. A model that arrives with Impeller, Drive Coupling and Inlet Manifold costs meaningfully less to process than the identical geometry named Body_017.
Real part names unlock the cheaper Basic tier. body_001 through body_400 forces Advanced, because there is no meaning to read.
What counts as a good name
The name a person in your company would use for the part.
Consistent across the assembly — not half real names and half exporter output.
Distinct: two different parts shouldn’t share a name.
You don’t need perfection or a naming standard. You need enough meaning that the words describe the thing.
Keep the body count sensible
Under 1,000 bodies is our recommended ceiling for a single scene.
Under 500 gives the best results, and is what we’d aim for on anything you intend to put in front of customers.
This isn’t an arbitrary limit. Above it, grouping quality degrades, processing costs climb in step with the body count, and the finished scene becomes harder to navigate for the person using it.
If your product genuinely needs more, don’t force it into one scene. Build it as several assemblies of under a thousand bodies each and combine them with Merge Scenes. You get the whole product, and each sub-assembly is understood properly rather than all of them being understood poorly.
Above ~1,000 bodies, split the product into sub-assemblies and combine them with Merge Scenes rather than forcing one oversized file.
Choose an anchor you are certain about
During upload you’ll pick one part, pick an axis, and type its true measurement. That measurement sets the scale for everything else in the file — every dimension the finished scene ever quotes is derived from it.
So pick something you know exactly, not something you can estimate:
A fastener is usually the best choice. An M8 bolt is 8 mm across the thread, and you don’t need to go and measure it.
Any standard part works — a bearing, a standard tube diameter, a mounting hole pattern.
A machined face with a drawing dimension is fine if you have the drawing to hand.
Don’t anchor on the overall envelope of the product unless you’re certain of it. Guessing the outside dimension to the nearest centimetre puts that same error into every measurement the scene will ever give.
Pick a small, simple, standard feature. It’s easier to be exactly right about a bolt than about a housing.
Anchor on something standard. An M8 bolt is 8 mm and you don't have to go and measure it — the whole scene is scaled from this one number.
Send engineering geometry
This platform is built for manufactured products — things with parts, assemblies, service procedures and real dimensions. It is not built for creative or artistic 3D.
Practically, that means geometry from a CAD or engineering source behaves far better than geometry built for rendering or games. Engineering models tend to have discrete parts, sensible hierarchy, and structure that reflects how the object is actually made. Assets sculpted for visual output tend to be one shell, retopologised for looks, with structure that reflects how it was easiest to model.
Engineering geometry carries the truth about how a product is made. Render assets carry how it was easiest to model.
If your only asset is a visual render model, it will still process — but expect to do more correcting in the documentation step, because the file carries less of the truth about the product.
What we discard
Rigging and skeletons are stripped. Movement in a scene is authored in the studio as animations, not inherited from the file.
Materials and textures are stripped. Appearance is set in the customization step, where you can apply materials and presets across the assembly.
So there’s no need to spend time on shading, texturing, or rigging before you send a model. That effort is discarded on arrival — put it into part structure and naming instead, which is what actually survives.
A checklist before you export
Export GLB.
No mesh contains physically separate objects.
Parts someone would ask about are separate; artefacts and decoration are joined.
Parts carry real names, consistently, not exporter output.
Body count is under 1,000, ideally under 500 — or split it and use Merge Scenes.
You know one exact measurement, on a simple part, to use as your anchor.
Don’t bother with materials, textures, or rigging.